Need any help or advice?+44 (0)1782 454499

VIDEO TUTORIAL

USED IN THIS PROJECT

Although not necessarily an exhaustive list, the following tools and materials, supplied by Easy Composites, were used in this project.

The quantity shown below is the approximate amount used in the project rounded up to the nearest available kit size or quantity.

TOOLS & EQUIPMENT
Composites Laminating Brush 1" (25mm) Individual Thumbnail
BR-LAM-1Composites Laminating Brush 1" (25mm) Individual£0.90 /each

High Precision Mini Scales (0.1g / 2kg) Thumbnail
SCALE2KGHigh Precision Mini Scales (0.1g / 2kg)£8.95 /each

10kg High Capacity Digital Scales Thumbnail
SCALE10KG10kg High Capacity Digital Scales£11.63 /each

Professional 8 Inch Carbon/Kevlar Scissors Thumbnail
SC-CK8Professional 8 Inch Carbon/Kevlar Scissors£45.00 /each

Total £0.00
MATERIALS & CONSUMABLES
Nitrile Gloves - Box of 100 Large Thumbnail
NG-100-LNitrile Gloves - Box of 100 Large£8.95 /pack

210g 3x1 Twill 3k Carbon Kevlar Cloth (1200mm) Thumbnail
CK-31-210-120210g 3x1 Twill 3k Carbon Kevlar Cloth (1200mm)£23.00 /linear metre

R210 Unperforated Prepreg Release Film 1.53 - 5m Folded Pack Thumbnail
AFR210-153-5PKR210 Unperforated Prepreg Release Film 1.53 - 5m Folded Pack£20.72 /pack

188g Plain Weave 3k Carbon Kevlar Cloth (1000mm) Thumbnail
CK-PL-188-100188g Plain Weave 3k Carbon Kevlar Cloth (1000mm)£19.75 /linear metre

Mirka P240 Wet and Dry Abrasive Paper 10 Sheets Thumbnail
WPF240-10Mirka P240 Wet and Dry Abrasive Paper 10 Sheets£6.45 /pack

Mirka P120 Wet and Dry Abrasive Paper 10 Sheets Thumbnail
WPF120-10Mirka P120 Wet and Dry Abrasive Paper 10 Sheets£6.95 /pack

ER1 Epoxy Rapid Repair Resin 1kg Kit Thumbnail
EP-RR-1ER1 Epoxy Rapid Repair Resin 1kg Kit£27.25 /kit

ER1 Epoxy Rapid Repair Resin 500g Kit Thumbnail
EP-RR-05ER1 Epoxy Rapid Repair Resin 500g Kit£17.00 /kit

45mm 400g Heavyweight Aramid Flat Braid Thumbnail
KFB-4545mm 400g Heavyweight Aramid Flat Braid£4.40 /linear metre

Total £0.00

VIDEO TUTORIAL

How to Repair a Damaged Composite Canoe or Kayak

In this easy-to-follow video tutorial we show our recommended process for how to repair a kayak with light to medium structural damage to a carbon/Kevlar.

The same process can be used for the repair of light to medium structural damage to any composite canoe, kayak or small boat including those made from glass fibre, carbon fibre, aramid fibre and diolen.

To make finding the right products easy, all the materials used in the video are available to buy online and are shown in the 'shopping list' on the right hand side of the page.


TUTORIAL BREAKDOWN

Remove any loose or broken resin or fibre

1. Remove any loose or broken resin or fibre

The first step is to remove any fractured, cracked or broken gelcoat, fibre or resin from the area to be repaired. We do this by carefully breaking away the damaged material using a knife or chisel.

Rub down area with coarse abrasive paper

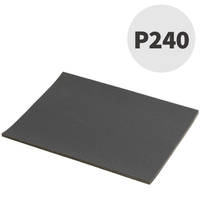
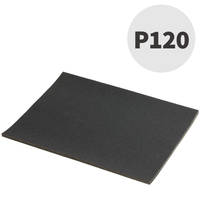
2. Rub down area with coarse abrasive paper

Before any resin is applied, it is essential to 'key' the area to be repaired using a coarse abrasive paper. We recommend a 120 grit paper. Ensure you rub down the whole area to be repaired; any areas not prepared in this way will be very difficult for the repair to bond to.

Cut reinforcement for repair patches

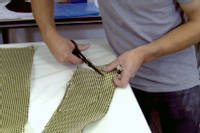
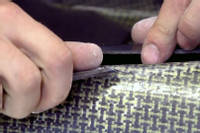
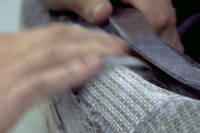
3. Cut reinforcement for repair patches

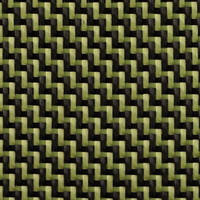
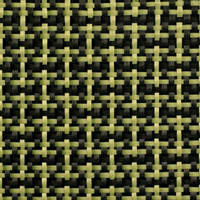
Work out the size of the repair patches required. We recommend patching a composite kayak, canoe or boat with the same type of reinforcement that the boat is made from. Not only will this look neater but it will also be a better match for the performance of the surrounding material; expanding, contracting and flexing in the same way. For carbon fibre boats; repair using carbon fibre patches, for glass fibre boats; repair using glass fibre and so on.

You will find it difficult to cut carbon/aramid hybrid fabrics (such as carbon/Kevlar® or carbon/Twaron®) using normal scissors and almost impossible to cut exclusively aramid fabrics. Kevlar® shears are recommended particularly if you will be cutting a lot of this type of material.

Thoroughly mix epoxy repair resin with hardener

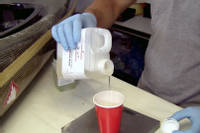
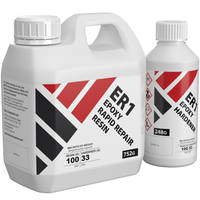
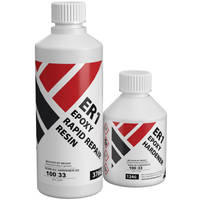
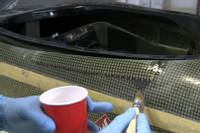
4. Thoroughly mix epoxy repair resin with hardener

For a repair like this to succeed it is very important to choose the right resin. Epoxy resin will bond far better to any composite boat and make a much stronger repair so should always be chosen over polyester or vinylester resin for repair work. Easy Composites' Rapid Repair™ resin is a modern, high performance epoxy system developed specifically for its high bond and flexural strength. It wets advanced reinforcements (like Kevlar, carbon, diolen, Dyneema® etc.) very well and cures in just a few hours.

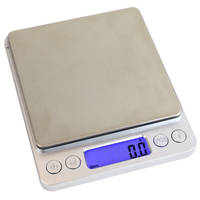
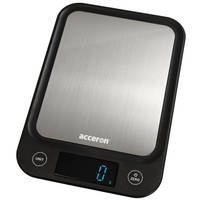
As with all epoxies, ensure that you mix the resin with its hardener at the correct ratio. Ratios provided by Easy Composites are part-by-weight not parts-by-volume so you should use digital scales to ensure accurate ratios.

Mix the epoxy very thoroughly before applying to the repair because any unmixed resin will not cure and so will spoil the repair considerably.

Apply a coat of epoxy resin to damaged area

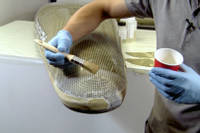
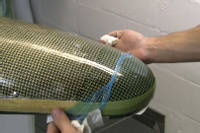
5. Apply a coat of epoxy resin to damaged area

Using a laminating brush, apply the mixed epoxy resin directly to the area to be repaired. Use the brush to ensure the epoxy is well worked into any cracked or exposed areas.

Apply reinforcement and wet-out with resin

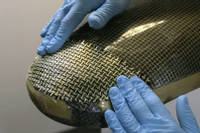
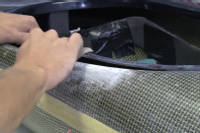
6. Apply reinforcement and wet-out with resin

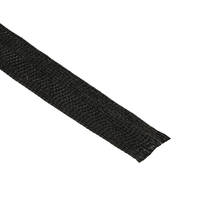
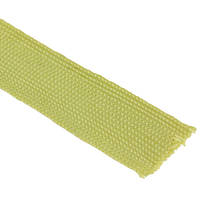
Place the reinforcement carbon/Kevlar and Kevlar flat braid onto the wet resin. Use the laminating brush to press it down firmly and then wet-out thoroughly using additional epoxy resin.

Stretch release-film over the repair

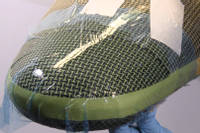
7. Stretch release-film over the repair

Once the repair has been laid onto the hull, drape a piece of unperforated release film all the way over the repair. Starting at one side, tape the film down to a dray area of the hull and then, pulling the film tight, tape it down to the opposite side of the repair. Continue the process on alternate sides until the release film has been pulled tight and wrinkle-free all the way over the repair.

Once the film is firmly in place, look at the repair through the film and identify any air bubbles. Use your finger or a plastic spread to move any such trapped air bubbles out off the edge of the repair.

8. Leave to cure fully

Leave the resin to fully cure. Depending on the resin and hardener speed you are using this could be anywhere from a few hours up to a few days. Using our Rapid Repair Epoxy the repair should take around 4-6hrs to reach a full cure.

Once cured, remove release film

9. Once cured, remove release film

To check the cure of the resin, test a small area on the boat where the resin is thinnest. If you check the leftover resin in the pot it will always be more cured than the resin in places on the part (resin massed in one place will exotherm and cure faster than thinner amounts of resin) which is why you should check a thin area of resin on the part.

Once you're satisfied that the resin has fully cured, remove the peel-ply which will fall away from the cured resin.

Flat any wrinkles prior to final overcoat

10. Flat any wrinkles prior to final overcoat

Any wrinkles in the resin can optionally be 'flatted' using abrasive paper such as a 120 or 240 grit. If you’re not concerned about the wrinkles or you don’t have any (because the release film has left a near perfect finish) then skip this step.

Overcoat with a final layer of resin

11. Overcoat with a final layer of resin

If you do flat off any wrinkles in your repairs then you must overcoat these areas with another application of the epoxy resin to seal the fibres and leave a glossy, hard-wearing surface.


DISCUSSION (9)

Please share any questions or comments you may have about this video tutorial.


Matthew Cassin
Is the release film necessary or could something like saran wrap or clingfilm suffice?
Easy CompositesMatt
The release film we use is ETFE which is an excellent combination of release properties (practically nothing sticks to it) with strength and stretch meaning it works really well for this type of repair. The problem with clingfilm is that they're not all made from the same material - some will release from epoxy resin and others will stick to it so it would be important to do a test run first. The second issue is that they're much more stretchy and less strong making it harder to get quick as good a finish, however, certainly experiment and you might find you can get results you're happy with.

Makan Tahi
This canoe is made too weak, they should put 2-3 layers more and it would never be damaged
Easy CompositesMatt
Its a balance between weight and strength when looking at competition Kayaks. An extra 3 layers could have added a couple of kilos to the weight.

J Baugh
If you just have damaged resin could you just apply the resin over the damaged areas to recreate a smooth finish?
Easy CompositesMatt
Yes, as you will see in the later part of the video we do just that and use the release film to make a smooth finish.

max Garci
great video! from your point of view what product is better for this kind of application carbon fiber or Kevlar/Carbon?
Easy CompositesMatt
Generally you would aim to repair using the same material the kayak was made with. In many cases these kind of kayaks are a Carbon/Kevlar hybrid cloth and hence that is what is used here.

Jack Rabbit
Is the epoxy finish up-resistant (i.e., will it withstand outdoor storage)? I know most epoxies are very susceptible to up damage, and was wondering if this product incorporates inhibitors?
Easy CompositesMatt
Hi Jack, the resin we use in this video is our Rapid Repair Resin; this resin specifically focuses on mechanical performance and so is not particularly designed to offer enhanced UV stability however it is part of a newer generation of epoxies which do hold up to UV light much better than older systems and so for repair use, as used in this video, it would be perfectly fine and still look good and work well for years to come. We do have epoxies which are specifically intended for cosmetic applications where any slight yellowing or discolouration would be a problem, such as our XCR (Xtreme Coating Resin) which could be used as an alternative to the Rapid Repair Resin (used in this video) if you're looking for the very best in UV stability.

pappasmurf1977
I've done a couple of repairs to my kayak now and the patches look pretty good, but I'm left with small pits from where there were tiny air bubbles left over, will this have a bad effect or is it merely cosmetic?
Easy CompositesMatt
If they are deep you can fill them with a light overcoat of resin - sometimes a cocktail stick can be used to dab resin into the hole. But if shallow and they sand out without exposing the fibres then all is good.

MrSM1957
Used this process to repair a 1/3 scale glider fuselage that had snapped in two places after a heavy landing. Release film makes life so much easier when applying the wet carbon. Great vids and a great range of products! Thanks!
Easy CompositesMatt
Thanks very much. Glad to hear the video helped, the products worked and the repair went well. Thanks for the feedback.

Alejandro Herrero Palacio
We have a similar boat in our shed that is sort of bent on the line of the joint between the hulls..., we were wondering if you have any experience on recovering the shape? Can we possibly heat it up and soften it and try to remold it?
Easy CompositesMatt
The resins used are generally thermoset resins if it is a composite boat, so heating it up is not generally going to work. You could jig the boat into the right shape (using some sort of temporary wooden frame) and then add considerable reinforcement and possibly some additional internal bulkheads or braces to hold the shape better.

kalix86
There are always way too many tiny air bubbles, and some are just impossible to move to the edge without accidently & permanently wrinkling the release film (which leaves a line in the finish). I've tried 4 repairs using these steps and have not been able to get the perfect finish yet.
Easy CompositesMatt
If you are still struggling with bubbles, very gentle waft a heat gun over the top of the bubble. The resin should thin slightly then the bubble will come to the surface and pop. Once most the big bubbles are gone, then apply the release film working from one side carefully to avoid air inclusion underneath. Even if you do get the odd wrinkle, you can sand it back flat, if necessary recoat, then polish back up to a gloss.

LEAVE A COMMENT OR QUESTION

Note: Your name will be abbreviated and your email address will only be used to email you the answer directly

USED IN THIS PROJECT

Although not necessarily an exhaustive list, the following tools and materials, supplied by Easy Composites, were used in this project.

The quantity shown below is the approximate amount used in the project rounded up to the nearest available kit size or quantity.

TOOLS & EQUIPMENT
Composites Laminating Brush 1" (25mm) Individual Thumbnail
BR-LAM-1Composites Laminating Brush 1" (25mm) Individual£0.90 /each

High Precision Mini Scales (0.1g / 2kg) Thumbnail
SCALE2KGHigh Precision Mini Scales (0.1g / 2kg)£8.95 /each

10kg High Capacity Digital Scales Thumbnail
SCALE10KG10kg High Capacity Digital Scales£11.63 /each

Professional 8 Inch Carbon/Kevlar Scissors Thumbnail
SC-CK8Professional 8 Inch Carbon/Kevlar Scissors£45.00 /each

Total £0.00
MATERIALS & CONSUMABLES
Nitrile Gloves - Box of 100 Large Thumbnail
NG-100-LNitrile Gloves - Box of 100 Large£8.95 /pack

210g 3x1 Twill 3k Carbon Kevlar Cloth (1200mm) Thumbnail
CK-31-210-120210g 3x1 Twill 3k Carbon Kevlar Cloth (1200mm)£23.00 /linear metre

R210 Unperforated Prepreg Release Film 1.53 - 5m Folded Pack Thumbnail
AFR210-153-5PKR210 Unperforated Prepreg Release Film 1.53 - 5m Folded Pack£20.72 /pack

188g Plain Weave 3k Carbon Kevlar Cloth (1000mm) Thumbnail
CK-PL-188-100188g Plain Weave 3k Carbon Kevlar Cloth (1000mm)£19.75 /linear metre

Mirka P240 Wet and Dry Abrasive Paper 10 Sheets Thumbnail
WPF240-10Mirka P240 Wet and Dry Abrasive Paper 10 Sheets£6.45 /pack

Mirka P120 Wet and Dry Abrasive Paper 10 Sheets Thumbnail
WPF120-10Mirka P120 Wet and Dry Abrasive Paper 10 Sheets£6.95 /pack

ER1 Epoxy Rapid Repair Resin 1kg Kit Thumbnail
EP-RR-1ER1 Epoxy Rapid Repair Resin 1kg Kit£27.25 /kit

ER1 Epoxy Rapid Repair Resin 500g Kit Thumbnail
EP-RR-05ER1 Epoxy Rapid Repair Resin 500g Kit£17.00 /kit

45mm 400g Heavyweight Aramid Flat Braid Thumbnail
KFB-4545mm 400g Heavyweight Aramid Flat Braid£4.40 /linear metre

Total £0.00

DISCUSSION (9)

Please share any questions or comments you may have about this video tutorial.


Matthew Cassin
Is the release film necessary or could something like saran wrap or clingfilm suffice?
Easy CompositesMatt
The release film we use is ETFE which is an excellent combination of release properties (practically nothing sticks to it) with strength and stretch meaning it works really well for this type of repair. The problem with clingfilm is that they're not all made from the same material - some will release from epoxy resin and others will stick to it so it would be important to do a test run first. The second issue is that they're much more stretchy and less strong making it harder to get quick as good a finish, however, certainly experiment and you might find you can get results you're happy with.

Makan Tahi
This canoe is made too weak, they should put 2-3 layers more and it would never be damaged
Easy CompositesMatt
Its a balance between weight and strength when looking at competition Kayaks. An extra 3 layers could have added a couple of kilos to the weight.

J Baugh
If you just have damaged resin could you just apply the resin over the damaged areas to recreate a smooth finish?
Easy CompositesMatt
Yes, as you will see in the later part of the video we do just that and use the release film to make a smooth finish.

max Garci
great video! from your point of view what product is better for this kind of application carbon fiber or Kevlar/Carbon?
Easy CompositesMatt
Generally you would aim to repair using the same material the kayak was made with. In many cases these kind of kayaks are a Carbon/Kevlar hybrid cloth and hence that is what is used here.

Jack Rabbit
Is the epoxy finish up-resistant (i.e., will it withstand outdoor storage)? I know most epoxies are very susceptible to up damage, and was wondering if this product incorporates inhibitors?
Easy CompositesMatt
Hi Jack, the resin we use in this video is our Rapid Repair Resin; this resin specifically focuses on mechanical performance and so is not particularly designed to offer enhanced UV stability however it is part of a newer generation of epoxies which do hold up to UV light much better than older systems and so for repair use, as used in this video, it would be perfectly fine and still look good and work well for years to come. We do have epoxies which are specifically intended for cosmetic applications where any slight yellowing or discolouration would be a problem, such as our XCR (Xtreme Coating Resin) which could be used as an alternative to the Rapid Repair Resin (used in this video) if you're looking for the very best in UV stability.

pappasmurf1977
I've done a couple of repairs to my kayak now and the patches look pretty good, but I'm left with small pits from where there were tiny air bubbles left over, will this have a bad effect or is it merely cosmetic?
Easy CompositesMatt
If they are deep you can fill them with a light overcoat of resin - sometimes a cocktail stick can be used to dab resin into the hole. But if shallow and they sand out without exposing the fibres then all is good.

MrSM1957
Used this process to repair a 1/3 scale glider fuselage that had snapped in two places after a heavy landing. Release film makes life so much easier when applying the wet carbon. Great vids and a great range of products! Thanks!
Easy CompositesMatt
Thanks very much. Glad to hear the video helped, the products worked and the repair went well. Thanks for the feedback.

Alejandro Herrero Palacio
We have a similar boat in our shed that is sort of bent on the line of the joint between the hulls..., we were wondering if you have any experience on recovering the shape? Can we possibly heat it up and soften it and try to remold it?
Easy CompositesMatt
The resins used are generally thermoset resins if it is a composite boat, so heating it up is not generally going to work. You could jig the boat into the right shape (using some sort of temporary wooden frame) and then add considerable reinforcement and possibly some additional internal bulkheads or braces to hold the shape better.

kalix86
There are always way too many tiny air bubbles, and some are just impossible to move to the edge without accidently & permanently wrinkling the release film (which leaves a line in the finish). I've tried 4 repairs using these steps and have not been able to get the perfect finish yet.
Easy CompositesMatt
If you are still struggling with bubbles, very gentle waft a heat gun over the top of the bubble. The resin should thin slightly then the bubble will come to the surface and pop. Once most the big bubbles are gone, then apply the release film working from one side carefully to avoid air inclusion underneath. Even if you do get the odd wrinkle, you can sand it back flat, if necessary recoat, then polish back up to a gloss.

LEAVE A COMMENT OR QUESTION

Note: Your name will be abbreviated and your email address will only be used to email you the answer directly

100% SECURE

    Secured by Digicert Payments by Adyen

PAYMENT METHODS

    Mastercard logo Visa logo Maestro logo PayPal logo Bank Transfer logo
    Staffordshire Chambers of Commerce member Composites UK member

Easy Composites Ltd, registered in England 7486797. All content copyright (C) Easy Composites Ltd, 2022. All rights reserved.